Tuesday, June 30, 2015

Fun & Bright

There is a Design Team Reveal up on the Just Imagine Crafts/Kreaxions Punches Blog today. The theme is “Fun & Bright”. Be sure to check out the blog to see what amazing projects the rest of the design team came up with.

What scrapbooker doesn’t have tons … ok maybe not tons but a LOT of scraps left over from paper projects. What better way to use up those scraps than to create a fun & bright card!?

I created this “thinking of you” card by making border strips with scraps left over from other projects. I used the Kreaxions 4 in 1 punches - 915, 916, 302, 910 & 909.


Friday, June 26, 2015

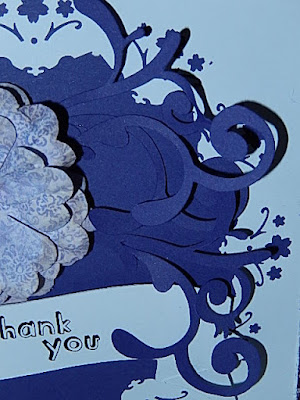
Thank You

It’s Friday and I have a Design Team project up on the Just Imagine Crafts/Kreaxions Punches Blog.

These days a “Thank You” is sent in the form of texts, emails, social media messages and phone calls. Call me old fashioned … but I don’t think there is a better way to say “Thank You” then by sending a card or note through the snail mail.

I created this “Thank You” card using the following Kreaxions products:
B Stencil
Circle Cutter (I must say this is one of my favorite scrappy tools.)
Kreaxions 4 in 1 punch #921
And the 6.8cm (small) Positioning Parts


Sunday, June 21, 2015

Birthday Bash Crop at Turtle Soup

To all my paper crafting friends ... hope you can join in the fun!


Saturday, June 13, 2015

My Creative Process

Someone asked me what my creative process was for creating scrapbooking layouts … hmmm? I had to think about it.

When creating a page I almost always start with the photo(s). I’ll add that most of the time I’m a one photo type of girl.

Then I think about the title. I have been know to ask Randy for help with coming up with a title. The title seems to set the mood for the page for me. So I often use a pun, quote or words that evoke feelings about the photo. Once I come up with a title I start to think about the actual design of the page. Sometimes I use a sketch to get me started. I rarely use a sketch as is. I like to change them up a little, even if that means just turning it on it’s side or upside down.

I’m going to say that most of my creative energy goes into picking the papers and the embellishments. I go through my stash and pull papers that will enhance the photo(s). Next I pull every embellishment I think is even a possibility to use. Papers and embellishments are based on color and/or theme.

Then the fun begins! This might include trying a new technique or new scrapbooking tool. I love to distress, layer, ink, paint, mist … you get the picture. Putting it all together means moving and tweaking the embellishments and then moving and tweaking them some more. Until finally scrapbooking perfection has been reached.

I struggle with journaling. I think I get so caught up in the page design that I forget about the journaling till the end (if at all).

If I’m working with a kit then the papers come first and then the hunt is on for the perfect photo(s). If it’s a new technique I want to try then I start with the supplies I need to accomplish that. I think I’m safe to say that my creative process changes depending on what I’m working on or with.


Leave a comment and your name will be entered into a random drawing for a RAK from me.
(You have until Sunday 6/28/2015 to leave a comment.)


For the following page:

1) I picked out a photo of Gracelynn. This was the easy part since my daughter Jessica takes so many cute photos of the kids.

2) Randy actually came up with the perfect title for this page. "be yourself ... everyone else is taken"

3) I picked out my background paper and applied a thin layer of Gesso with a makeup sponge.
a) to keep the paint from soaking into the paper and
b) to make the paper a little stiffer so I could apply heaver elements and layers


4) I decided my layered patterned paper and photo would go in the middle of this page. I applied some distressed paint with a makeup sponge to the outer edges. I applied one color at a time, allowing for drying time. Since I don't have a lot of patience I used a heat gun to speed up the drying time.


5) Although I’m going for the fabulous finished page … sometimes I think it’s more about the process than the finished product. The hunt is on! I find it almost therapeutic to look for the perfect embellishments to complete a page.  When digging through my stash I always find supplies I was hoarding ... I mean I forgot I had.

 
6) Now the process starts of putting it all together. This means tweaking the design and moving embellishments around until I’m satisfied with the results.


Friday, June 12, 2015

Oh so lovely

Sharing a design team project which is on the Just Imagine Crafts/Kreaxions Punches Blog today.

I created this card using the following:
Circle Cutter
B Stencil
Kreaxions 4 in 1 punch #919
Positioning Parts 8cm (lg)
I also used the negative pieces from the punch.
Be sure to check out the Just Imagine Crafts/Kreaxions Punches Blog to see what the rest of the Design Team did this week.


Tuesday, June 9, 2015

Staining Music Sheets

It’s Tuesday and I’m sharing the Tuesday Tools, Tips and Technique Challenge at Turtle Soup.

I have so many crafty ideas that I want to try. The problem is I never have enough time to do them. So I have made a list of projects and techniques that have caught my eye … and slowly but surely I am going to work my way through that list.

I found a stack of vintage music books at a thrift store and have several ideas in mind for them ... which brings me to the following project.


1) I had Randy make me a pot of strong coffee.  (I don't drink coffee therefore I don't make it.)


 2)  I poured the coffee into a pan and let it cool.


3)  I laid the music sheet in the pan of coffee and let it soak for about 5 minutes. 


 4)  I took the music sheet out of the pan, and placed it on paper towels to soak up the excess water.  I then placed the music sheet on a cookie sheet.  I baked each music sheet in the oven at 250 degrees for 5 minutes. (Keep an eye on this while it's in the oven.)


5)  I then smoothed out the music sheet on my craft mat.
(Loved the way it is stained.)


 6)  I rolled each music sheet and used glue dots to secure the ends together.


 7)  I finished by tying a piece of twine around each rolled music sheet.


I needed 16 music sheets to fill my jar so I repeated this process
16 times ... oh the things we crafters do!  I'm sure there are
other quicker ways to stain paper.  Sometimes it's more
about the creative process than it is the finished project.